The UKG Pro Learning solution provides you with a powerful reporting tool, giving you the ability to track academy members' progress in a number of ways.
Members with Admin rights or Managers with Reporting permissions are able to create customized reports and then export them as CSV files. Moreover, they can create report templates that will be available to anyone who has reporting permissions. Last but not least, they have the option to schedule the reports to be automatically delivered to either themselves or to others within the organization based on the academy's org structure. The Report Builder provides very detailed data about your members' training performance, based on the specific parameters you set up.
Navigation: Admin > Reporting > Report Builder > Create New Report
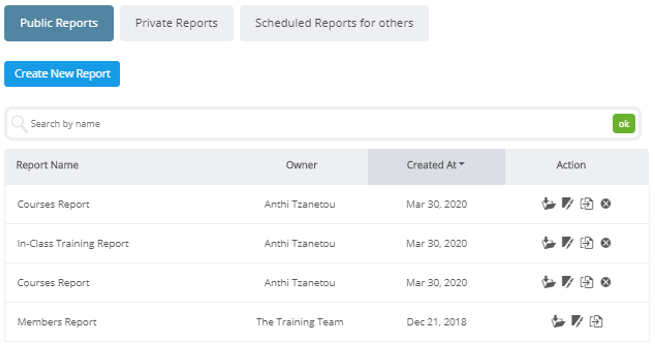
There are Public and Private Reports.
- Private reports are viewable only to the individual who created them. They are either simply marked as “Private” or include specific organizational elements the report is tracking since not everyone has the same access.
- Public reports are those that are accessible to anyone who is able to run reports. Reports cannot be saved as public if an organizational element is selected. Think of public reports as baseline templates. Organizational elements can be added before running the public report.
- Scheduled reports are those that will run consistently at set times.
Reports can be edited or deleted only by the individual who originally created the report. Reports can also be downloaded and copied. Reports can also be organized into sections.
Create Reports
- Select the Create New Report button.
- Choose your desired report type.
- Select Continue. You can return to the previous page, if needed, by selecting the Back to control panel button at the top of the page.
- Once you have selected the type of your report, you are ready to set up the Report Options.
-
Give the report a unique name that differentiates it from others like it.
-
Select from the drop-down list the item(s) on which you'd like to run the report, verify the correct time zone, and determine the group of members to use.
-
Select the Fields that you want to include. Fields in white can be deleted if not needed. Rename the field by selecting the gear icon. Rearrange the order as needed by drag and drop; the order of your fields also defines the order of the columns in your report.
-
Add new fields by selecting them from the drop-down list.
-
The description will appear in the report when opened.
-
If you'd like to schedule a report to run at set intervals, select the arrow to view its options.
- Add a custom message to the email sent out with a scheduled report and the Save and Download notification.
-
Determine who should appear in the report using your organizational structure and rules.
-
Select Click Here to Preview Data to view a sample of what the report will look like. The preview will only include the first few results, not the full report.
-
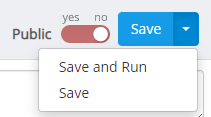
If specific organizational elements are chosen, the report can be published as Public. Anyone with reporting capabilities in your academy can access it, and then run the report on whomever they'd like. If marked Private, it will be yours and yours alone to use in future reporting.
-
Select Save if you just want to save the report, or Save and Run if you want to download the report now and also save it for future use.
-
Note:
- Only Private reports can be related to a specific Unit/ Above Unit.
- Managers will be able to download every public report, but they will not be able to see the data from other Above Units or Units not connected to their Above Units.
- Μanagers can create only private reports.
- Admins can create and save Public Reports without selecting any organizational structure. Managers can only save Private Reports of this type (without selecting any organizational structure)
- Only Private reports can be scheduled to be sent via email.
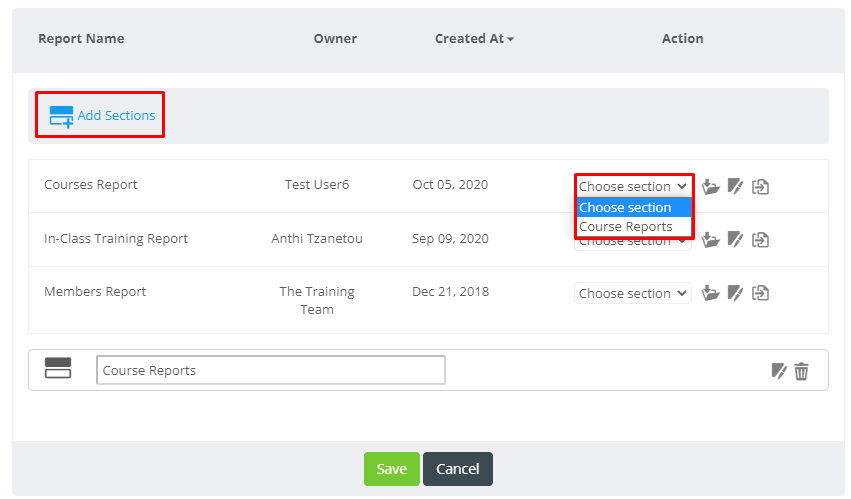
Sections
You can create Sections to Categorize your Saved Reports. To create a section select Add Section, add a section name, and click Save. Then you will be able to categorize each saved report individually, to your preferred section.
Report Options
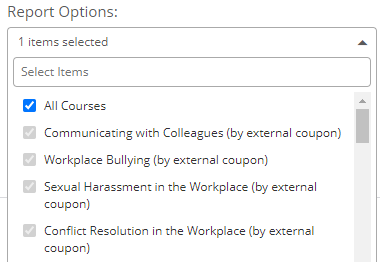
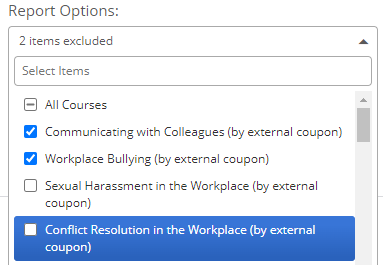
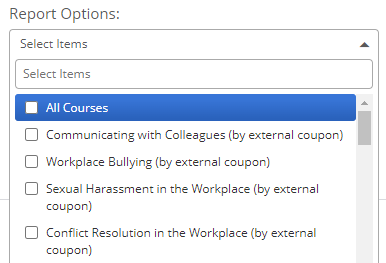
In the Report Options, you have the option to select if your report will include data from all of the academy's events, courses, and curricula, or from specific ones. You can select to include "All items", select all and deselect some of them, or select specific ones. Just click on the "All Items" checkbox to find the three different selections.
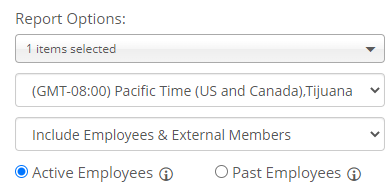
A dropdown with all time zones is available where you can select in which timezone you want the date/time fields to be displayed in your report. You also have the option to select if your report should include both Employees and External Members, or only Employees/External Members. Last but not least, you can select if you want to populate the report for Active or Past Employees.
Schedule Report
You have the option to create scheduled reports for you or other members within your organization. You can now set up the needed parameters, based on your needs.

Fields
Every type of report has some predefined fields. You can now edit these fields, add or delete some of them, and change their order (with a simple drag and drop), creating the report that perfectly meets your needs. The order of your fields also defines the order of the columns in your report.
Combining Structure
You can create reports using multiple filters, for example taking into account two types of above units. On the top of the page, select the Above Unit and the Unit for which you wish to create a report.![]()
To use multiple filters, select the + icon on the filters.
Select the extra Above Unit and Unit you wish to take into account for the report.

- 1 OR 2: to include the users that are either in the first or in the second org node
- 1 AND 2: to include the users that are in both org nodes 1 and 2.
- 1 NOT 2: to include the users that are in the first org node but are not in the second one.
Access Reports
Reports will be saved in the Report Builder tab. If the report is a public one, it will be available also to Managers with the Reporting permission enabled. If the report has been scheduled to be sent to others within the academy, it will be displayed under the Scheduled Report for others tab.
There are several actions available to you regarding the reports you have created:
- Download - In the new window that arises, you have to select at least one Above Unit in order to be able to download any report. Only Admins are able to download a report without having selected a specific org node.
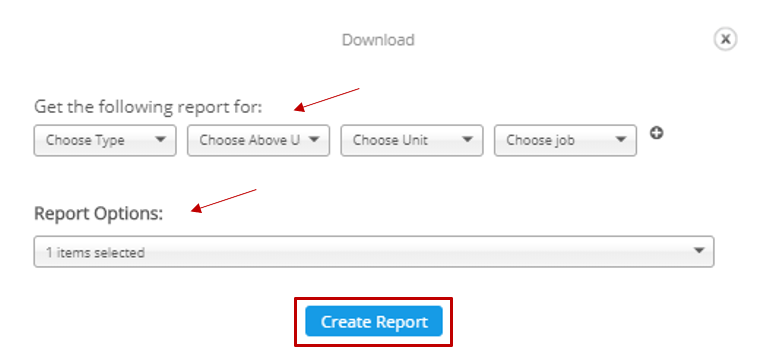
Additionally, you have the option to change the selected entities of the saved reports, during the download process (courses, curricula, events, and so on).
- Edit
- Copy
- Delete
- Create now - To immediately create the report and notify recipients when the report is ready (Available only for scheduled reports).